Crocheting myself a DIY ukulele case; that last few steps
Hello again! Thanks for taking the time to read part three in my DIY tutorial on crocheting a ukulele cover. This is the post where I discuss the last stages and finishing touches of the crocheted ukulele cover.
I have covered the planning, and the sewing of the main body of the work previously in Planning and Making. So far, we are here:

The last stages of making your own ukulele case
After crocheting a checkerboard pattern for the sides and neck, I was in the final stretch. I needed closures for the bottom of the body of the uke, crocheted button holes and to sew on the buttons. Finally, creating the carry strap, setting the D-rings into the back of the uke case and sewing the D-clips into the strap itself would complete the ukulele carry bag.
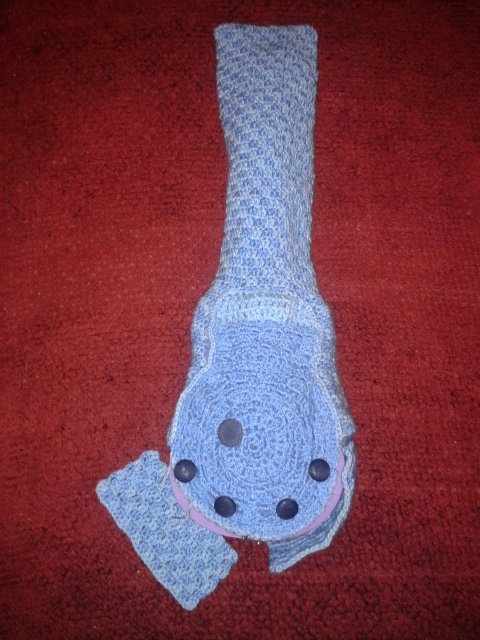
To close the cover, I decided on two flaps that would close one half of the bottom each. These would be held in place by two buttons apiece, instead of the previous plan of only two buttons in total.
A third closure, the longest strap, would stretch around the bottom, secured by a fifth button. This would be the inside strap holding the uke inside the case.
So again, I began to crochet, feeling mildly trapped in the checker board pattern I had so clearly not completely thought through when beginning. I created the two flaps. I made their width the same length as the depth of the uke itself, to maintain a tight fit to the case.


At one end of each, I knocked up some (sort-of) fancy bits of lace in lieu of buttonholes. After sewing on the flaps, I knew where the buttonholes would sit, so I knew where to sew the buttons! I had a set of four uniform ones and a kind of dingy, faded cloth one. Very quickly, I crocheted over the feral one to make a fabric button for the side strap.


After measuring the length around the base of the uke, I created the long strap. I used the same fancy button closure tab as with the first two. The strap is designed to go around the inside, so after sewing the long edge, I fastened it and measured for the last button.


Button sewn! Lastly, there was just the simple matter of making a carry strap, and how to attach it. I wanted something versatile, so had already decided on D-clips and rings. I crocheted the rings directly onto the back of the case, and after finishing the strap, I sewed each end to the attachment ends of the D-clips.


Forgot to take photos of this step, but I have included a link in Related which has a lot of different strap tutorials available if needed.
The very last step is to admire your new case for far, far too long! Checkerboard was a pain but I treasure how it looks now. Kind of unique and completely all mine, the best aesthetic.

Related:
There is a great how-to-create a crochet button tutorial available here.
Crochet your own strap for a ukulele (or uke carrybag!) with the dozens of different tutorials available on Pinterest.
I have written a few tutorials, mainly to do with paper, food and textiles. I keep them all in the How-To category.
👁 Can you help keep the patterns flowing out and the lights on? Donate here, every penny helps 👁🦄💖

Responses
[…] A three-part breakdown of crocheting a ukulele case: One, Two, Three […]
[…] while in a small space is something to tackle in many ways depending on what you can create! I also crochet and make […]
[…] A crocheted ukulele cover […]
[…] Ukulele cover […]
[…] Crocheted ukulele case (part three of a three part series) […]